
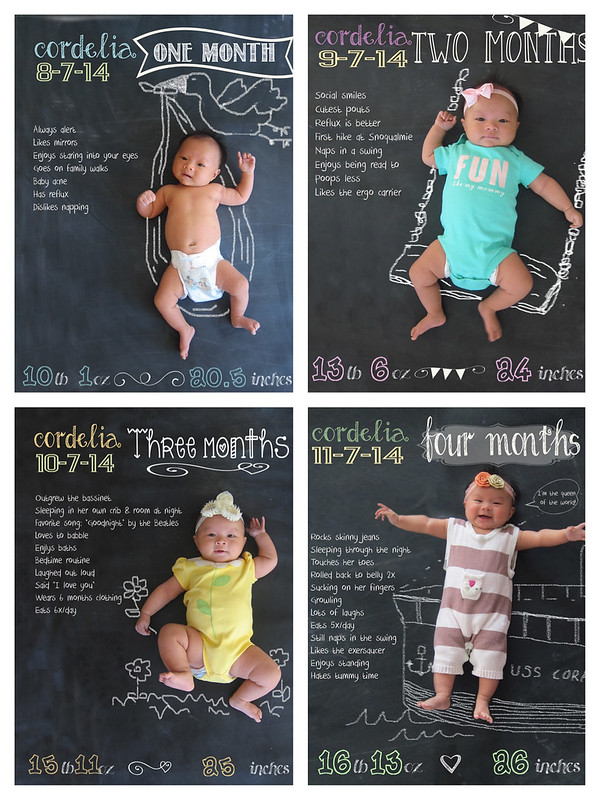
Chalkboard is definitely "in", judging by all the cute chalkboard decorations cropping up with baby photos and party events on Pinterest. I combined monthly stats with the chalkboard baby photos for Cora to have everything in one spot
Materials:
- blackboard fabric
- photo editing program (photoshop, etc)
- chalk
There are instructions with the fabric on how to "prep" the fabric (this includes coloring the entire thing with chalk and wiping it off 2x- I had my niece and nephew do this for me). It has a thick vinyl feel to it.
The only problem with the fabric is that it is 27.5" wide. I only bought 1.5 yards (so dimensions are 27.5" by 54"). It would probably be best to buy two pieces of 1.5 years, and put them side to side to increase the width (gets you 55" by 54").
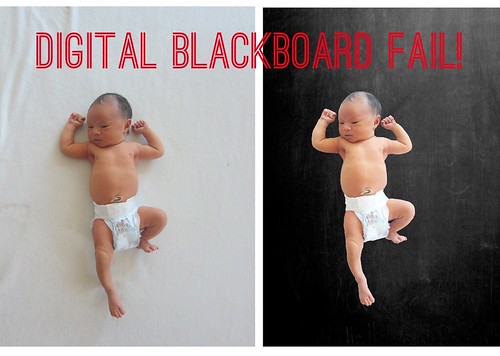
2. Take lots of photo of baby on the fabric. Yes, you could choose to draw your chalk drawing directly on the fabric and take a photo of baby on it and avoid the digital editing. I choose to use photoshop for my chalk drawings because I never know what I want to do for the chalk drawing until I've picked the final pose I'm going to use since baby will move around A LOT as she gets older and you never know what you will end up with.

4. The CHALKBOARD FONTS I used are referenced from this great blog: http://www.yellowblissroad.com/favorite-free-chalkboard-font-combos/
All the links to download the fonts are on that page.
5. To digitally make the chalk board drawings: Use a brush in "Dissolve" mode in photoshop to get a chalk effect. You can also experiment with decreasing the opacity of the brush. Or, try any paint application's spray paint brush
6. Be inspired!
- This person did a chalkboard photo for her baby every week!
- http://www.lifewithfingerprints.com/search/label/Baby
- This person put their baby on an actual large chalkboard, which is a option if you can find a board big enough. The fabric version is probably cheaper, if you use your good old Joann's coupons
- http://twistedsifter.com/2013/06/chalkboard-adventures-of-a-newborn-baby/
- Some more chalkboard/baby drawings:
- http://www.cutemomentsphotography.com/blackboardadventures_lr.html
No comments:
Post a Comment